
Introdution
Glory is an under development, modular game engine and editor, written in C++. Check out the website for more information about Glory, or check out the GitHub page for the source code.
This site serves as a documentation for using Glorious, the engines editor, as well as to provide scripting references for built-in scripring modules.
These docs will continue to grow and be expanded upon to improve user experience.
Installation
Prerequisites
The editor uses Visual Studio 2019/2022 to compile your C# scripts. You also need to have .net framework 4.7.1 installed. If you use a custom scripting module then this is not required.
Download and Install
You can download the latest version of the editor here. Either download the installer and run it, or the portable zip and extract it to a folder of your choice.
Once installed you can open the project hub by running GloriousLauncher.exe
Quick Start Guide
Have a look at the quickstart guide for a short tutorial to make your first game with Glory.
Quick Start Guide
In this short guide we will make your very first game in Glory. It is a simple game but it should help you to grasp the basics of using the editor, as well creating your own scripts to create custom behaviors.
The Hub
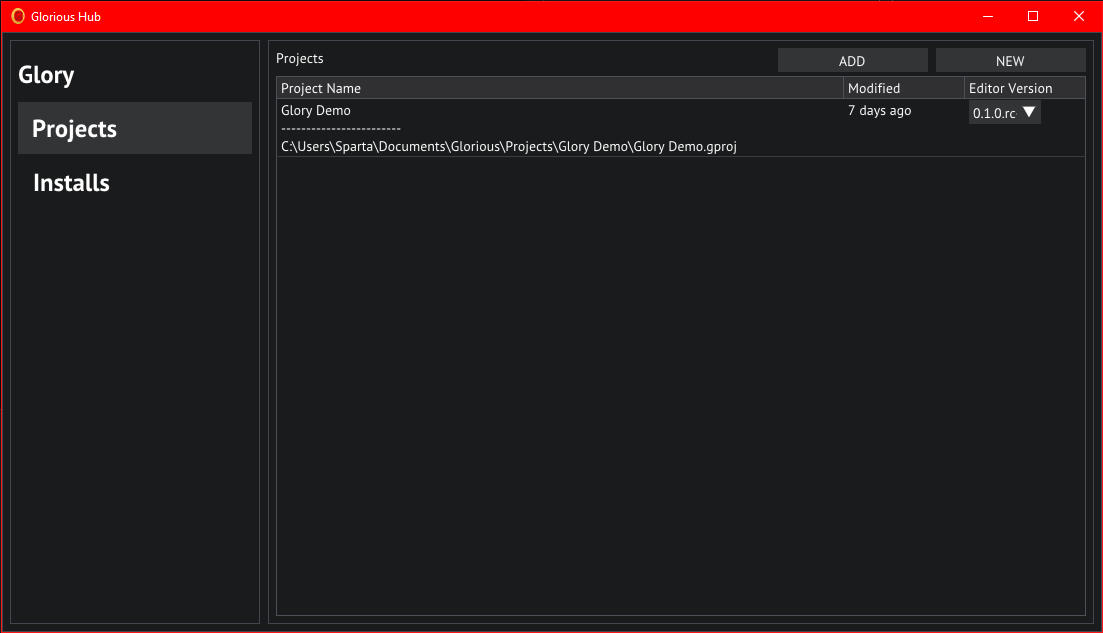
Project hub
Let's start by opening the project hub, this is the GloriousLauncher.exe that came packaged with your download.
In the project hub we'll click on the NEW button in the top right, this will bring us to the new project wizzard.
Select the latest version of the editor you have installed under Editor Version and name the project "Glory Demo",
we'll use the Default template to get some basic assets and settings set up for us.
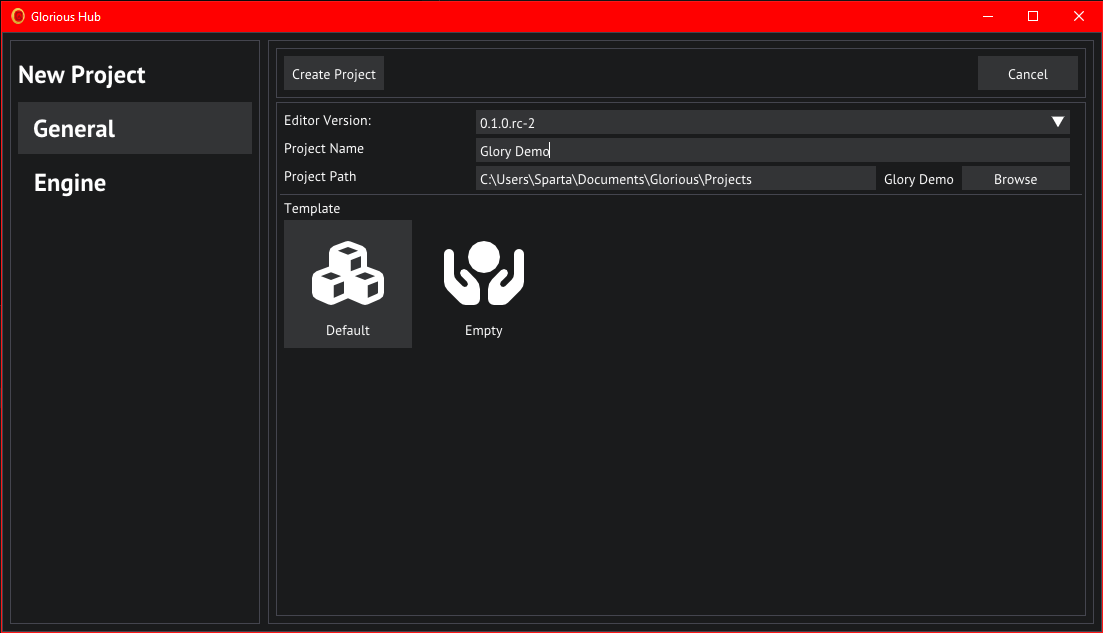
New project in hub
We will not be playing around with the Engine tab on the left, so have a look if you wish but leave the settings as default for this tutorial.
The Editor
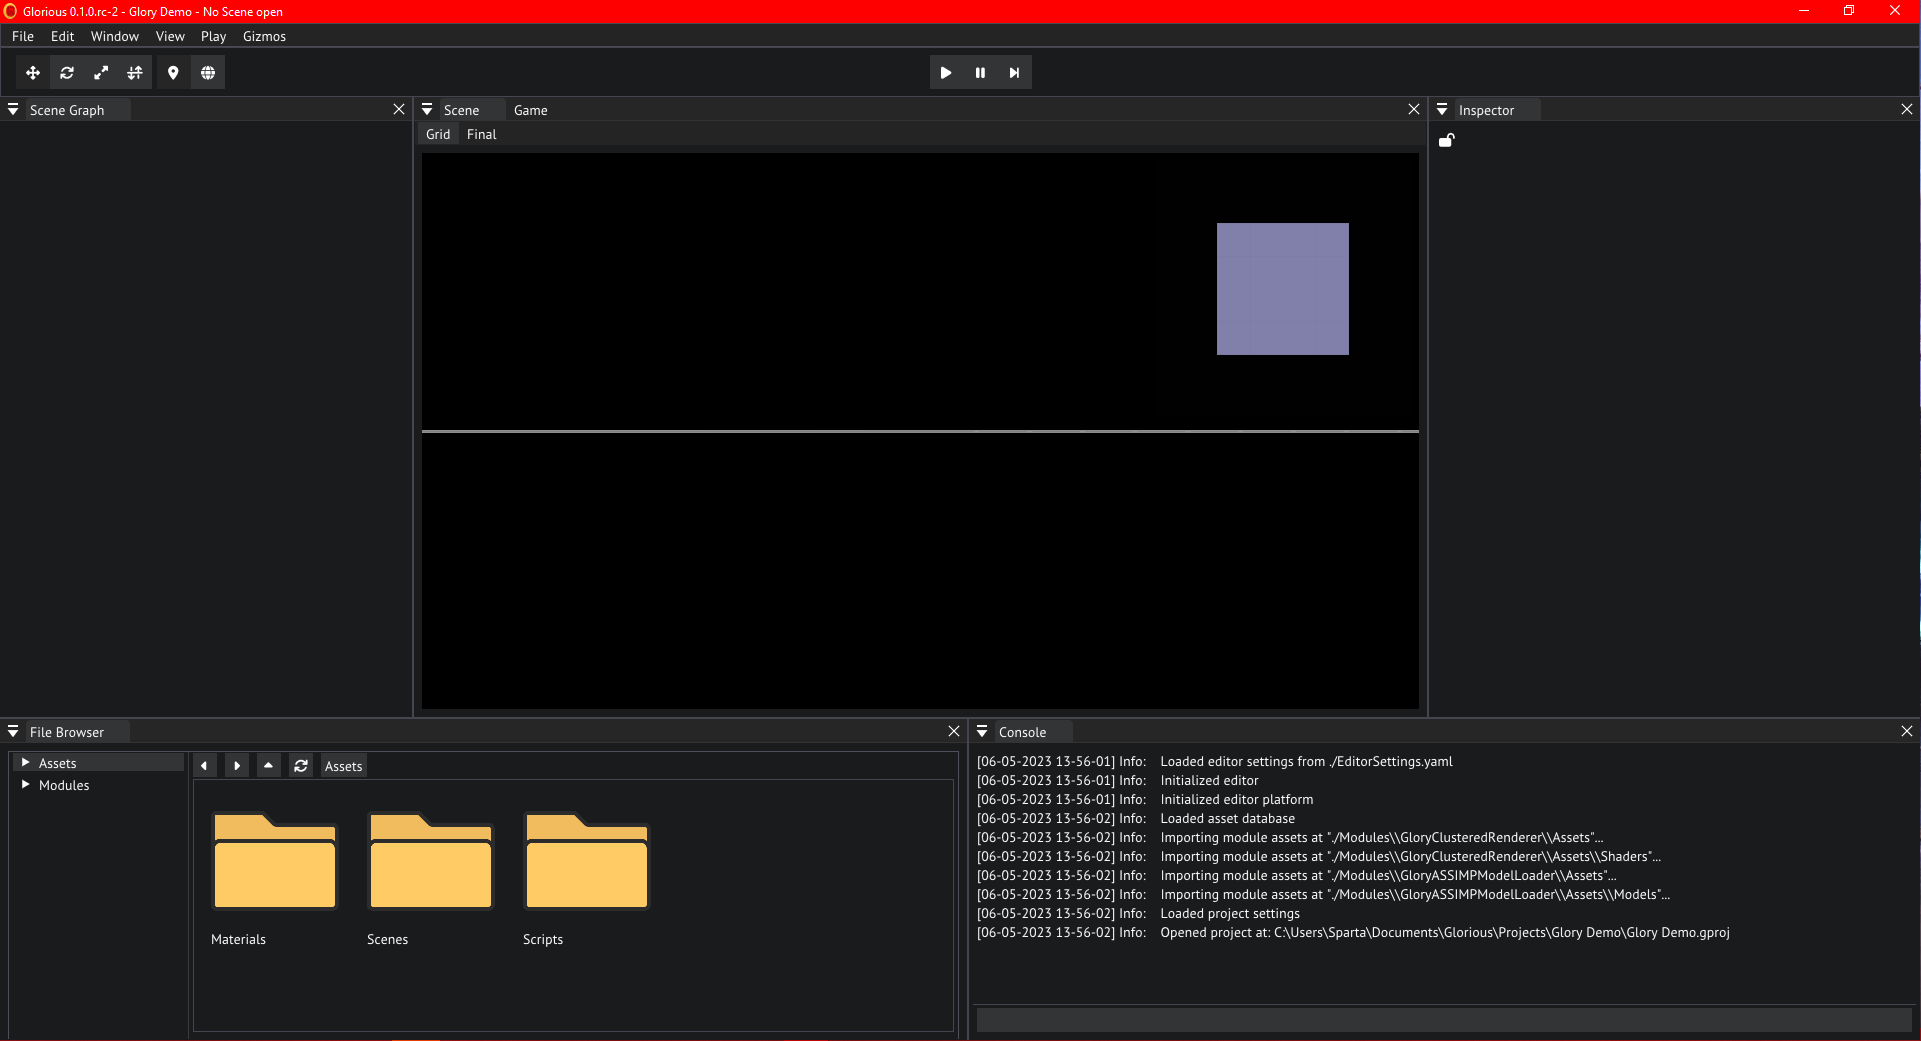
The editor
After project creation finishes the editor will open. Go ahead and open the SampleScene in the Scenes by first double clicking the folder and then the file.
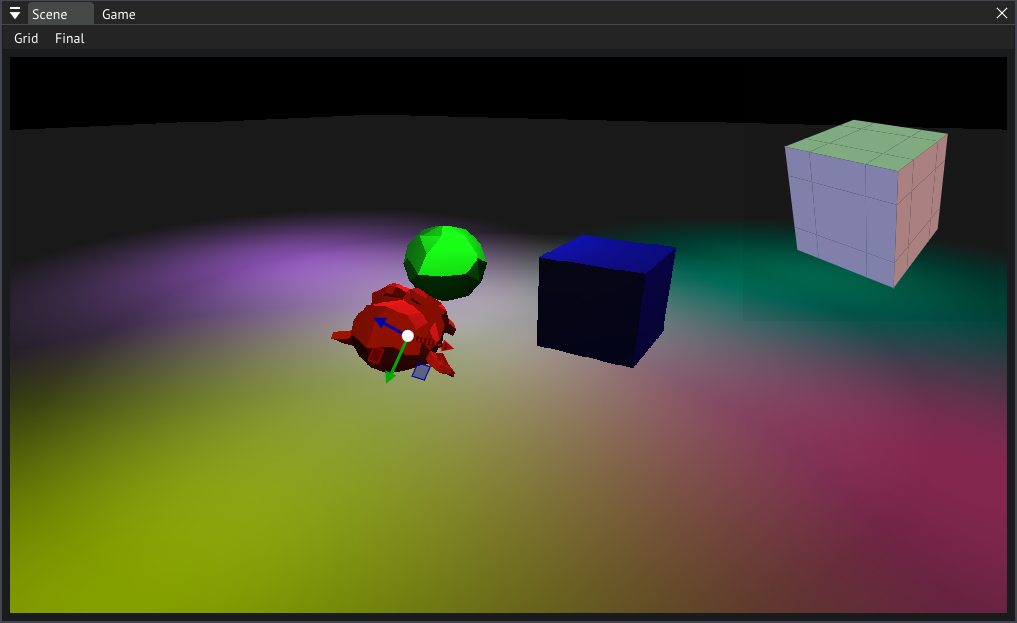
Scene View
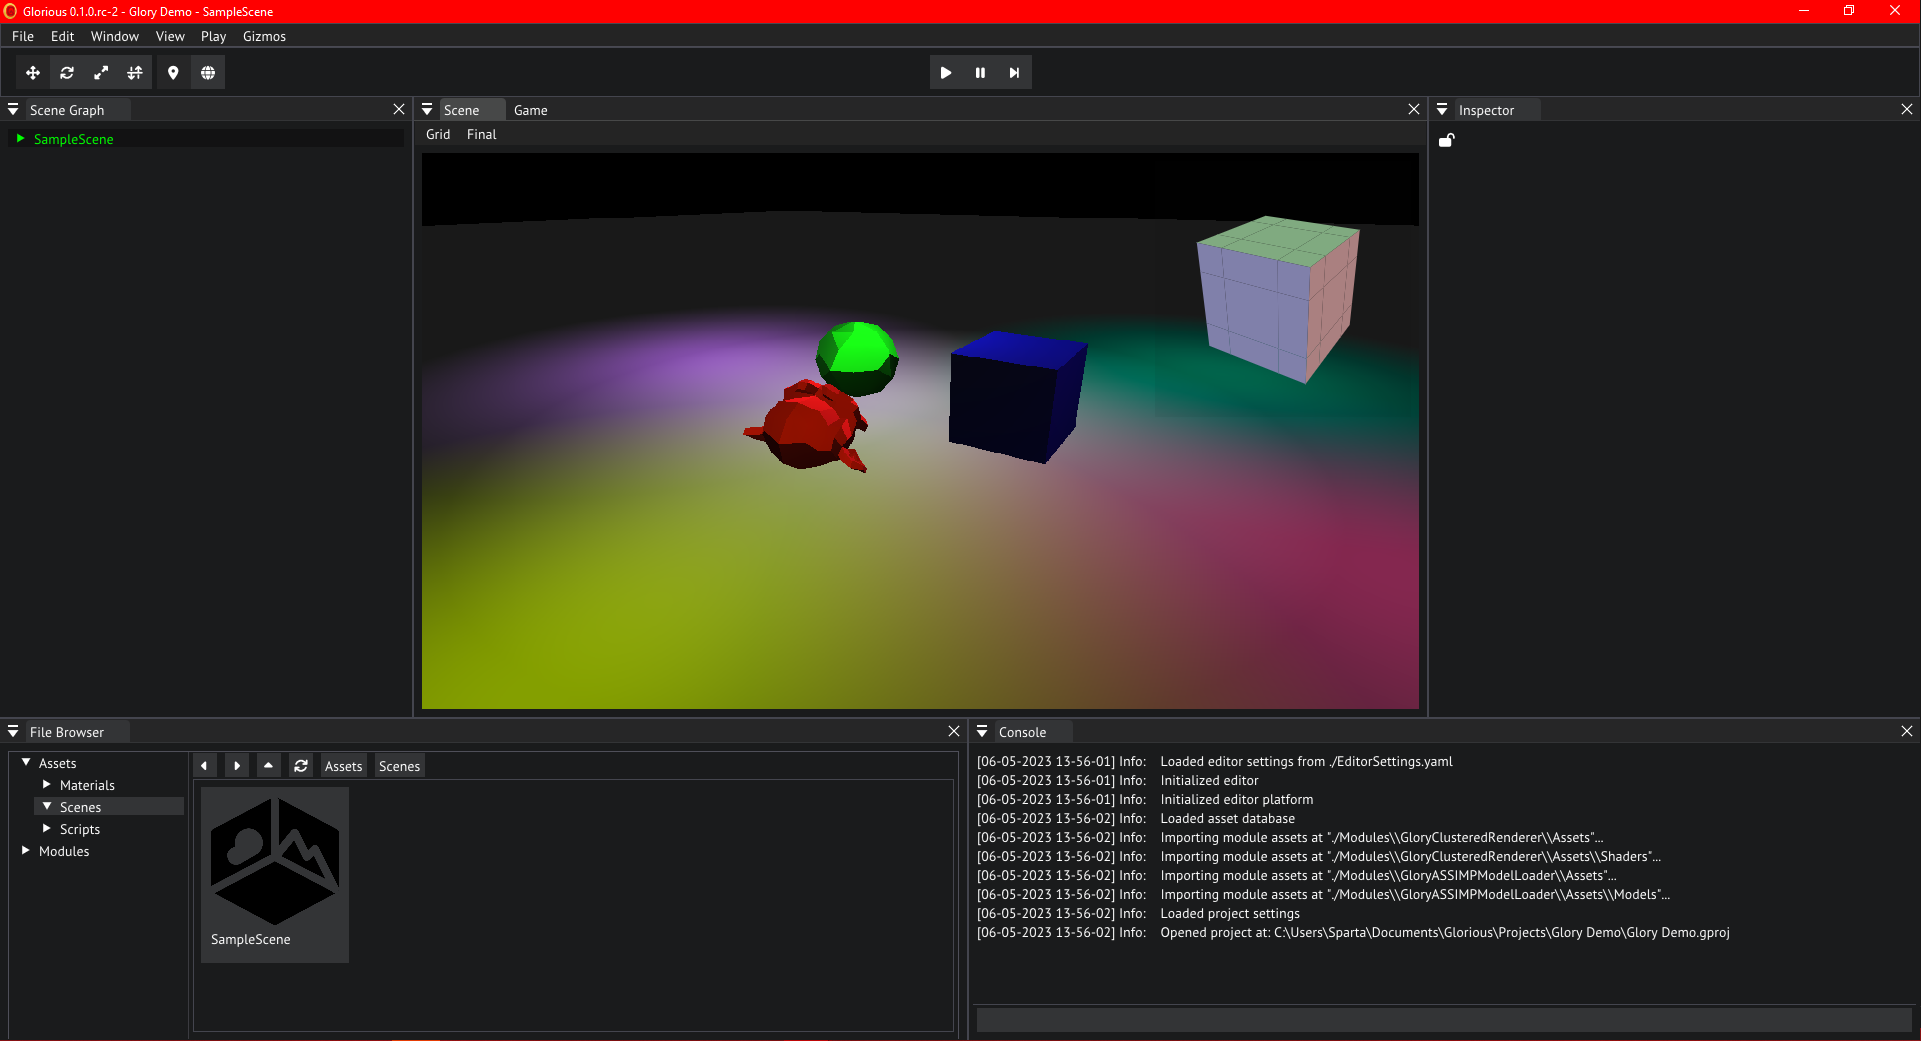
Sample scene in the default template
Let's take the time to get used to the interface and controls. Hold the right mouse button anywhere in the scene view and drag the mouse to look around. Use wasd to move relative to your look direction, and Q and E to move up and down. Hold shift to double the speed at which the camera will move.
Scene Graph
On the left of the editor you will find the scene graph, go ahead and unfold the SampleScene by double clicking its header or by clicking the arrow on the left of it.
We can see all objects currently in the scene, in this case these objects are entities because we are using the entity scenes module packaged with the engine. Go ahead and click on one of the lights.
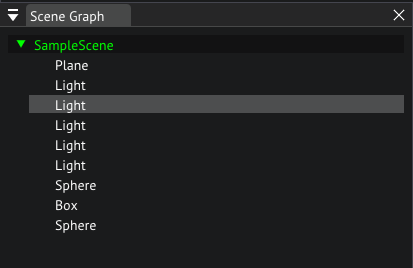
Scenegraph of the sample scene
If we now look at the right of the screen, we can see the inspector, this where you are able to change the properties of objects and assets. Let's play around with the intensity and color of this light, change it until you are satisfied.
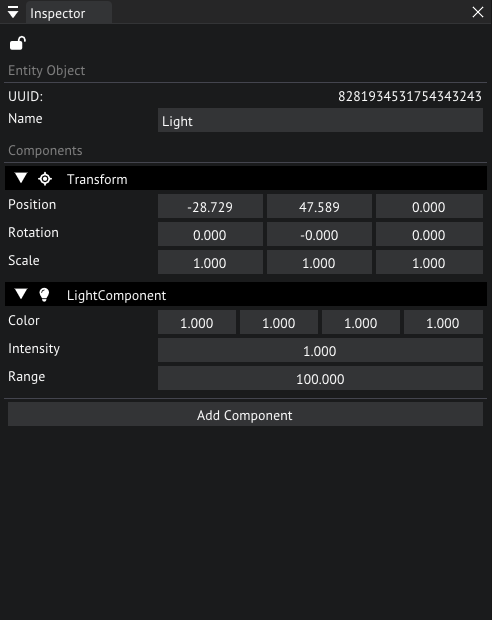
Inspector of one of the light objects
Now let's click on suzan in the scene view, it is the monkey head. We'll now see different components in the inspector. This entity makes use of a MeshRenderer to render a mesh asset. Try moving the object around with the gizmo in the scene. Enable the move gizmo with W and move the object around. You can also move it by manipuulating the values in the Transform component in the inspector.
Scene view with Suzan selected in the sample scene
Press R on your keyboard, this switches to a rotation gizmo, now rotate the object until you are satisfied.
Next, press S on your keyboard, this switches to the scaling gizmo, scale the object until you are satisfied.
You can also press a shortcut multiple times to switch between World and Local space gizmos, this is usefull for when you want to move an object in the direction it is facing.
Camera
Our scene is currently missing a camera, this is an entity with a CameraComponent that will render our scene through the view of the player.
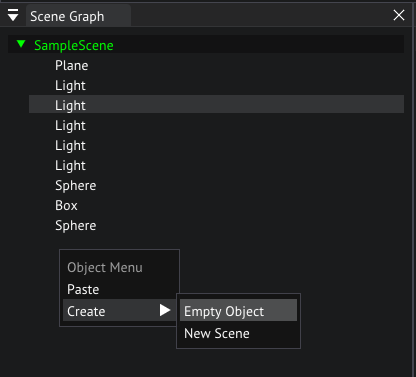
Right click the empty space in the Scene Graph and choose Create/Empty Object, after the object is created let's change the name in the inspector to Camera.
Creating a new object
Click on Add Component in the inspector and choose "CameraComponent" you can use the search bar at the top to search for it if you can't find it.
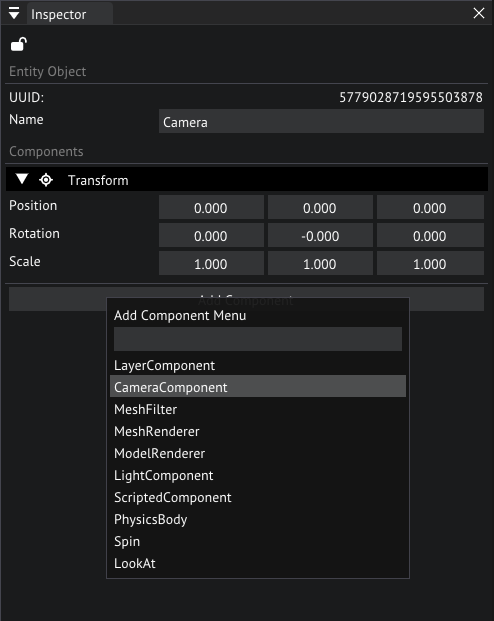
Adding a camera component
Set the Half FOV to 60 by double clicking the number and entering 60 on your keyboard. Do the same for Far but set this to 3000.
The display index will determine what virtual display we will be rendering to, with display 0 being the main display that will be shown to the player, so we leave it at 0.
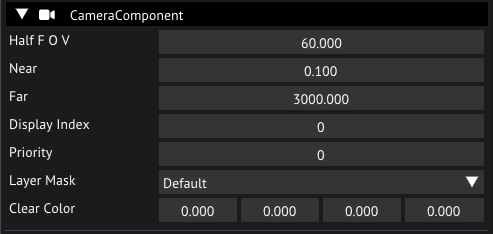
Camera settings in the inspector
Leave the Layer at Default, what layers are and how to use them is beyond the scope of this tutorial. You can play around with the clear color. Now move your new camera entity to have a view of our scene and switch to the Game tab to see a preview.
With the camera entity still selected, let's add a ScriptedComponent to it so we can add some custom behavior.
The CameraComponent requires a script, let's set it to the FlyCam that comes packaged with this template by clicking on the dropdown and selecting FlyCam.
This script exposes a Free Look Sensitivity property to manipulate the mouse sensitivity of the camera.

Script settings in the inspector
Why don't we have a look at this script, go ahead and navigate to the Scripts folder in the File Browser, now double click FlyCam.
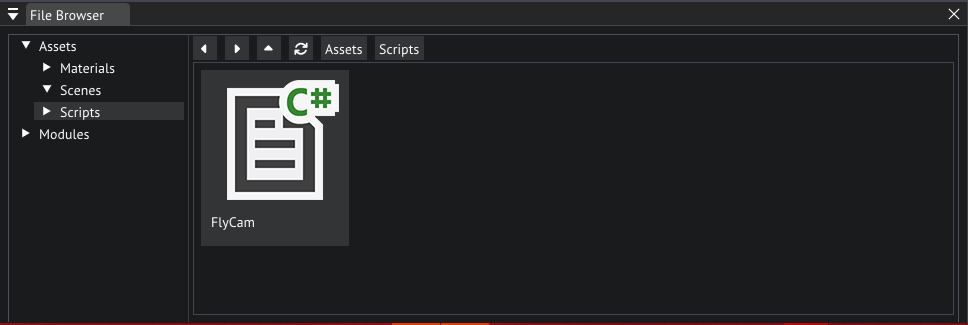
FlyCam script location in the file browser
This should open visual studio, if this is not the case it either means you do not have visual studio installed or the editor could not find your VS installation. If the latter is the case please refer to the mono preferences
Let's analyze the code.
using GloryEngine;
using GloryEngine.Entities;

namespace Sponza
{
    // Custom behaviors must inherit the EntityBehaviour class
    public class FlyCam : EntityBehaviour
    {
        // This our exposed sensititivity property that shows up in the editor
        public float _freeLookSensitivity = 1.0f;

        // We can cache the CameraComponent into a private field for later usage
        private CameraComponent camera = null;

        // The engine will call this function once when we hit play
        public void Start()
        {
            // Here we cache the CameraComponent on the current entity in the camera field
            camera = Entity.GetComponent<CameraComponent>();
            // This line tells the input system that player 0 will be using the Keyboard and Mouse input, more on this later
            Input.SetPlayerInputMode(0, "Keyboard and Mouse");
        }

        // The engine will call this function every frame while we are in play mode
        public void Update()
        {
            // We get the axes of the vertical and horizontal movement mappings
            float vertical = Input.GetAxis(0, "Movement", "VerticalAxis");
            float horizontal = Input.GetAxis(0, "Movement", "HorizontalAxis");

            // Next we get the axes of the mouse horizontal and vertical movement, note that these are deltas
            Vector2 mouseDelta;
            mouseDelta.x = Input.GetAxis(0, "Movement", "AimHorizontal");
            mouseDelta.y = Input.GetAxis(0, "Movement", "AimVertical");

            // Here we ask the Input system if the Use action was triggered during the current frame
            bool use = Input.IsActionTriggered(0, "Interactions", "Use");

            // Log the use activation in the console
            if (use) Debug.LogInfo("Use action triggered!");

            // These are some math calculations to move the camera
            // We start by getting the current position
            Vector3 pos = Transform.LocalPosition;
            // Next we'll increase that position by the amount of vertical movement (forward and backward) multiplied by our forward vector of our transform
            // We'll also add the horizontal movement multiplied by the right vector of our transform for strafing
            pos = pos - Transform.Forward * vertical + Transform.Right * horizontal;
            // Finally we'll override the position with our newly calculated position
            Transform.LocalPosition = pos;

            // These are the maths for rotating the camera
            Mat4 rx, ry, roll;

            Vector3 referenceUp = new Vector3(0.0f, 1.0f, 0.0f);
            rx = Mat4.Rotate(-mouseDelta.x * _freeLookSensitivity * Time.DeltaTime, referenceUp);
            ry = Mat4.Rotate(mouseDelta.y * _freeLookSensitivity * Time.DeltaTime, Transform.Right);

            roll = rx * ry;

            Vector4 newDirV4 = new Vector4(Transform.Forward * -1.0f, 1.0f);
            newDirV4 = roll * newDirV4;
            Vector3 newDir = new Vector3(newDirV4);
            newDir = newDir.Normalized;

            Transform.Forward = newDir;
        }

        // The engine will call this function every frame
        public void Draw()
        {
        }
    }
}
Now you should have a basic understanding of how to write scripts, but we'll write a new script later.
Input
You've probably noticed the various Input references in the script above. Glory comes with its own input management system to make it easier for you to bind your actions to multiple devices.
Let's have a look, open the Input settings by selecting View/Project Settings in the menu bar, and then opening the Input tab.
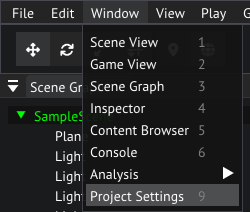
Opening project settings from the main menu bar
You'll see 2 headers here, Input Modes and Input Maps.
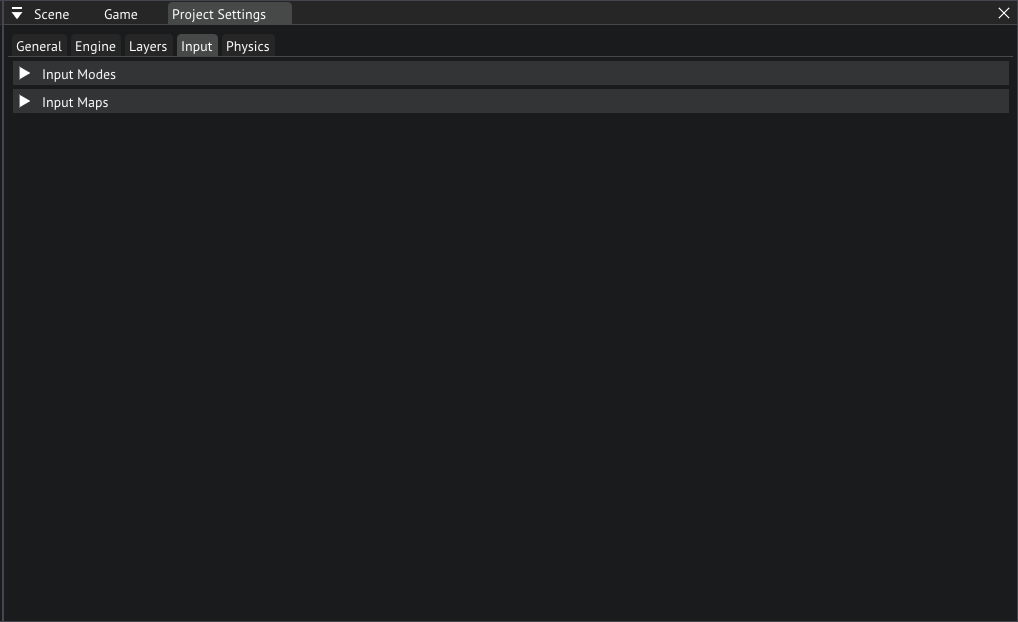
Input tab in project settings
Input Modes is where you'll create modes that define what input is being used, for example Mouse and Keyboard uses the mouse and keyboard devices, but you could also add a Controller mode that uses a gamepad.
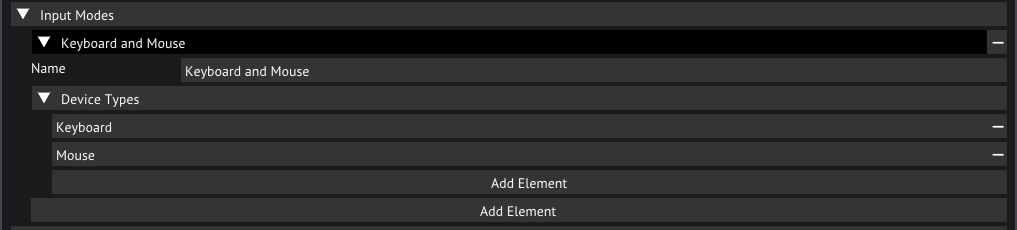
Input modes in the inpout settings
The Input Maps is where you will be defining your binds, for each input mode.
Open the Input Maps, you'll now see 2 maps appear, 1 for Movement and 1 for Interactions. Let's open the Movement map.
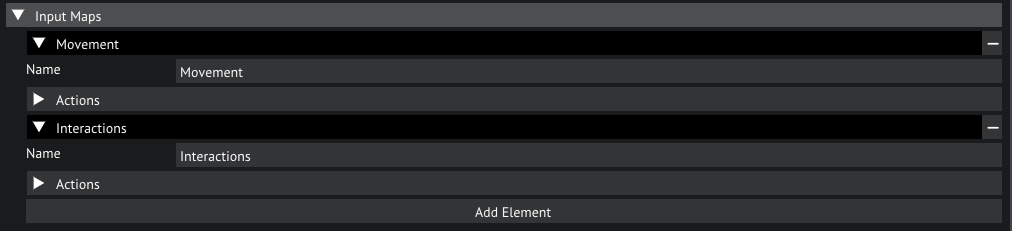
Input maps in the inpout settings
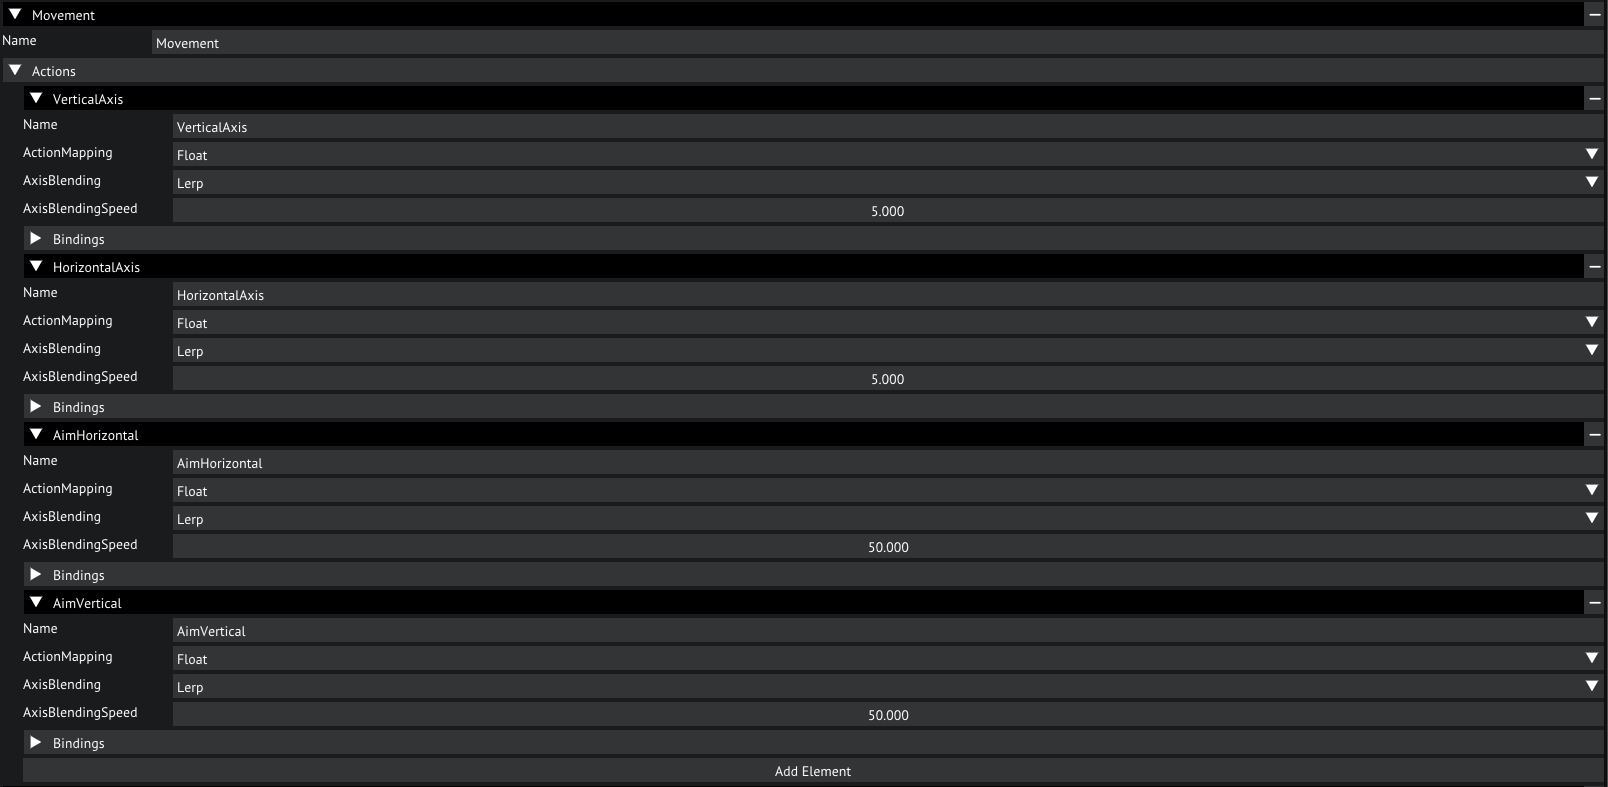
In this map we split up each axis into its own action. The vertical and horizontal axis of movement and aim are all mapped to a float and have a Lerp blending enabled. The float mapping means that it will map the raw input value of the device to the action as a floating point number. If we set this to Bool it will be mapped as either on or off. The Lerp blending blends the current value linearly to the new value rather than snapping it, which will make input feel more smooth. We can set this to Jump if we do not want to have any smoothing. SLerp is also an option, this is similar to Lerp but will blend the value in a smoother curve rather than a linear curve. Lastly we have the blending speed, this is how fast the current input will be blended to the new input. Note that this option is only available when Lerp or SLerp is slelected as blend mode.
Movement map
Now, on to the bindings. Let's open that. Here we can see what bindings we have mapped to this action. Each binding has a multiplier, an input mode and a binding path.
The MapDeltaToValue option is especially usefull for analog aiming axes like a mouse.
The multiplier will multiply the input value by the chosen number, can be used to flip the signal or to simply scale it.
The Input Mode determines which input mode this bind will be active with, if a different input mode is active this bind will be disabled.
Lastly, the binding path. This defines which key or axis we bind to this binding.
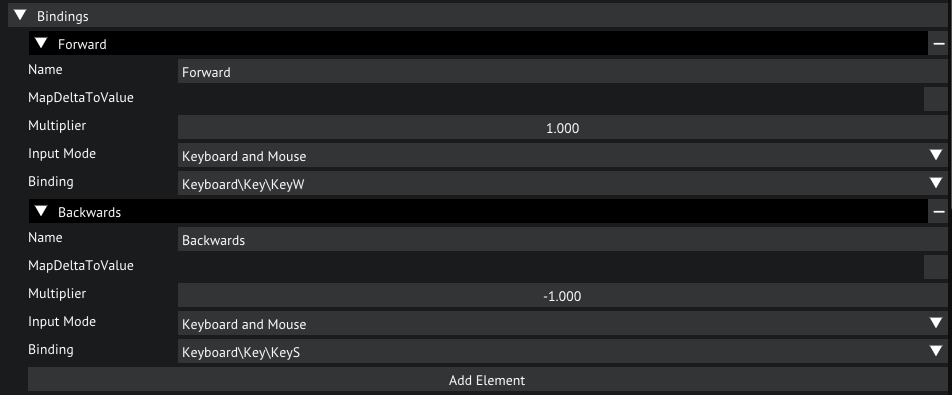
Bindings for the VerticalAxis action
Have a look around these settings, now you should have full understanding of how to make your own bindings and modes.
Make sure to save your project if you make any changes here by selecting File/Save Project.
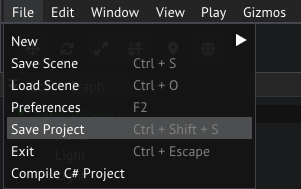
Saving the project from the main menu bar
Physics
How about we add some physics to this scene. Glory comes packaged with a jolt physics module, a module that implements physics using the Jolt Physics library.
To configure physics we go to the Physics tab in the Project Settings window. Here we can configure which layers can collide with eachother.
Let's make World collide with only World, and disable all the other collisions by unchekcing the checkmarks in the matrix accordingly.
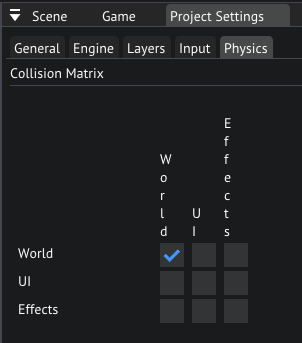
Physics collision matrix
The Jolt module also has its own configuration, you can find this in the Engine tab in the Project Settings window, and selecting Jolt Physics in the menu on the left.
We won't be going over what these settings do, leave them at default.
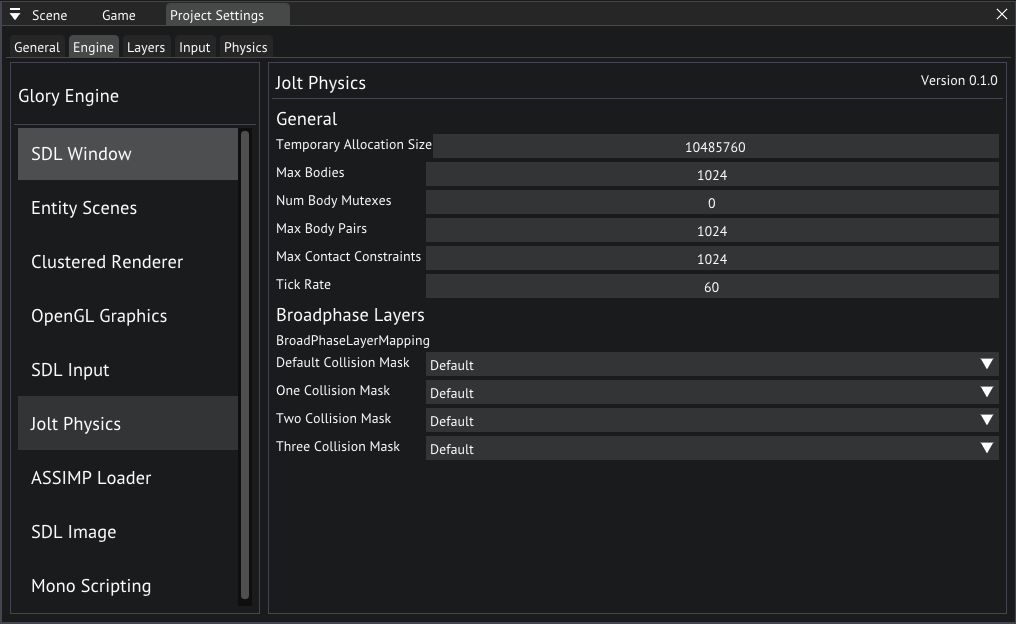
Jolt Physics settings
Now it is time to add some physics! Let's go back to our scene view and click on the ground plane.
In the inspector, let's add a PhysicsBody component, since this will be the ground we want it to be static, so set the m_BodyType to Static.
Open the Shape and set the Shape Type to Box, set the Extends to {1000,1000,1}.
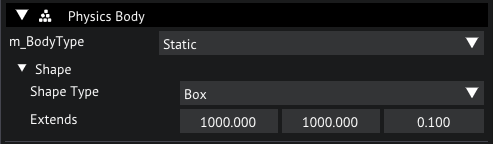
PhysicsBody for ground plane
Now that we have a ground, let's add some Dynamic bodies, select the Sphere by clicking on it and add a PhysicsBody to it.
Leave the m_BodyType to Dynamic and set the Shape Type to Sphere. The default Radius should be the right size.
Let's do the same to the cube, but with a Box shape. Let's move both bodies up a bit.
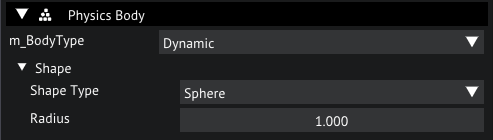
PhysicsBody for Sphere object
Now hit play, you can see the cube and sphere fall until they hit our ground plane. It is possible to manipulate these objects while the simulation is running using the gizmos or the transform component properties.
Have a go at experimenting with other shapes and body types, you should now have the basics to create your physics worlds in your scene.
Scripting
Time to write a script! Let's write a script that makes the sphere jump when we hit the spacebar.
Before we do that we have to add the Jump action to our input. Open the Input Settings again and add an action to the Movement map by clicking Add Element under Actions.
Let's name this new action Jump and map the action to a Bool, we'll add a binding for Keyboard and Mouse and set the path to Keyboard\Key\KeySpace.
Also, set the State to KeyPressed.
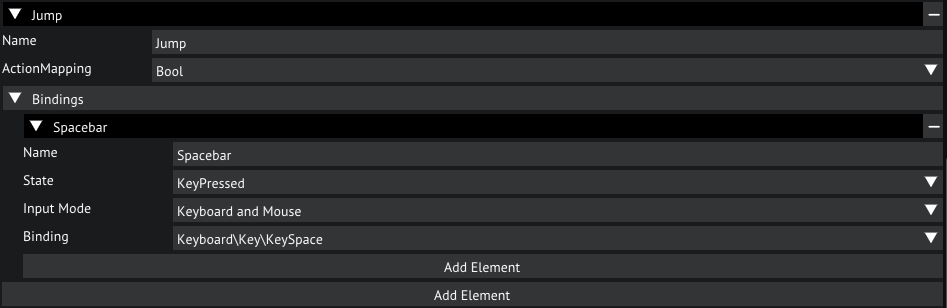
Input settings for the Jump action
Now that that is out of the way we can write our script. Try writing it yourself before using the solution provided below.
Let's make a new script by navigating to the Scripts folder and right clicking an empty space in the File Browser choose Create/Script/C#, name the script Jump.
Now open the script, and paste the following code into it (remember, try writing it yourself first).
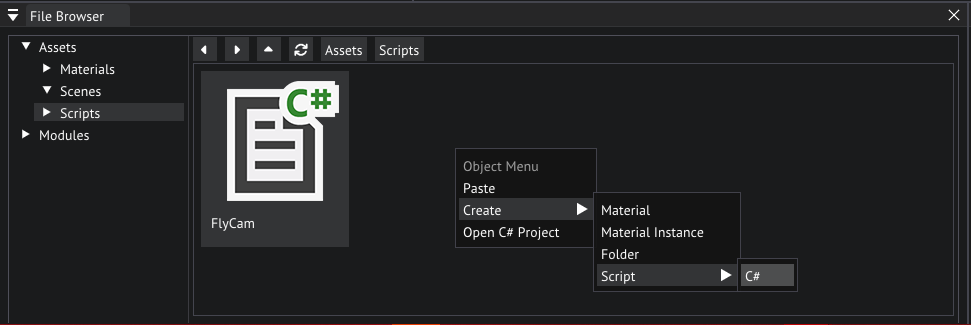
Creating a new script
using GloryEngine;
using GloryEngine.Entities;

namespace Sponza
{
    public class Jump : EntityBehaviour
    {
        // The strength of our jump exposed as a property
        public float _jumpStrength = 10.0f;

        // A cached instance of the PhysicsBody
        private PhysicsBody _body = null;

        public void Start()
        {
            // Get the PhysicsBody from the entity
            _body = Entity.GetComponent<PhysicsBody>();
        }

        public void Update()
        {
            // Check wether the Jump action in the Interactions map was triggered this frame
            bool doJump = Input.IsActionTriggered(0, "Interactions", "Jump");

            if (doJump)
            {
                // Set the linear velocity to an upwards vector scaled by the jump strength
                _body.LinearVelocity = new Vector3(0.0f, _jumpStrength, 0.0f);
            }
        }
    }
}
You may have to manually compile your scripts by selecting File/Compile C# Project.
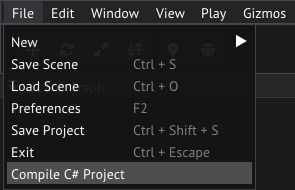
Compiling scripts from the main menu bar
That's it! Go ahead and add the script to the Sphere in the sample scene and try it out by pressing the play button and opening the Game view for a preview.
Press the spacebar on your keyboard to see the sphere jump!
Have a go at writing your own scripts, scripting is an essential part of the engine to make any custom behavior you desire. For a full API reference, please refer to the scripting seference.
Conclusion
You should now be familiarized with the basics of using the editor, creating new objects, adding components and writing scripts.
Now get started on your own games! The only limit is your imagination!
Project Hub
Glorious has its own launcher/hub for managing projects and editor installations, similar to the Unity Hub.
The Hub
The Hub currently contains 2 tabs, Projects and Installs.
You can navigate these tabs with the respectable buttons on the left, the Projects tab will be open by default.

The Hub
More tabs will be added as the project develops.
Projects Tab
In this tab you can see a list of your ongoing projects. This list shows information about where the project is located, when it was last modified, and the editor version it was last saved in. Clicking on a project will open it in the selected editor.
The ADD button on the top right allows you to add a project to the hub manually, by locating its .gproj file in a file browser.
The NEW button will open the new project wizard.
You can use the dropdown under Editor Version to select any editor you currently have installed.

Select an editor
Installs Tab
The installs tab shows your currently installed editors, these are the editors located in /Editor/.
The Locate and Install Editor buttons currently do nothing.

Installs Tab
Creating a New Project
Click the NEW button in the Projects tab to open the project wizard.
Configuration of a new project is split up in multiple tabs, at the moment there are only 2 tabs, but more tabs will be added for settings like templates, default values, etc, as the project develops.

New Project Wizard
When any of the selected settings are invalid, the Create Project button will be grayed out and a red text will display what the problem currently is.
General Project Settings
In the General tab you must select the editor you wish to use for this project, if none is selected the Create Project button will be grayed out, and the Engine tab will have its settings grayed out.
Enter a name for your project or click the Browse button to save to a custom location and name.
Engine Settings Tab
Since the engine is modular, the modules you wish to use need to be specified. The Engine settings tab allows you to do this.
Window, Graphics, Renderer and Scene Management modules are required, leaving these blank will block you from creating the project, as the editor can not open without these.
Optional Modules are not required to open the editor, however, 2 optional modules will be set by default, 1 for model loading, and 1 for texture loading.
Removing these will not prevent you from creating the project, however, using a game engine without the ability to load textures or models seems quite useless. You may replace these with your own loaders, or add more modules as you see fit.
Use the + and - button to add and remove optional modules, then select a module from the dropdown.
You can not add the same module twice!

Engine Settings Tab
Windows
The editor has a number of dockable windows.
- Main Window which holds the main menu, toolbar and is where windows can be docked on
- Scene Graph where a list of loaded scenes and their objects are displayed
- Scene View where your loaded scenes can be previewed from any angle
- Game View where you can test your scene in play mode
- Inspector where you edit properties of any selected object
- File Browser where your projects files can be browsed
- Console where information is logged and commands can be executed
Main Window
The main window is where all sub windows can be docked. Sub windows can be docked in any way to your liking. At the top of the main window you can find the various menus to save your project, open windows, change gizmos, etc.
Underneath the main menu you can find the main toolbars, the gizmos toolbar on the left, and playmode controls in the middle.
Scene Graph
The scene graph displays a list of currently loaded scenes and their objects.
Create a new Scene
A new empty scene can be created by right clicking the window and selecting "Create->New Scene". This new scene will automatically be added to the scene graph so you can start editing it. Other loaded scenes will remain open.
Create a new Object
You can create a new empty object by right clicking the window and selecting "Create->Empty Object". If no scene is open, a new scene will be created automatically for you, otherwise the editor will automatically add the object to the currently active scene.
You can create a new object in a specific scene by right clicking the header for that scene and selecting "Create->Empty Object".
It is also possible to create a new object in another object, by right clicking the object and selecting "Create->Empty Object". The editor will automatically parent the new object to the object that was right clicked.
All of the above actions can also be performed by selecting an object/scene and pressing the actions corresponding shortcut.
Copying, Duplicating or Deleting Objects
Any object can be copied by right clicking the object and selecting "Copy". It can then be pasted on another object/scene by right clicking the destination object/scene and selecting "Paste".
If you select "Duplicate" the object will be copied and pasted inside the current parent or scene if the object does not have a parent. Note that duplicating an object will duplicate its entire hierarchy.
Selecting "Delete" will remove the object and its entire hierarchy from the scene completely.
All of the above actions can also be performed by selecting an object/scene and pressing the actions corresponding shortcut.
Saving Scenes
Right-clicking a scene in the scene graph reveals 2 options for saving your scene. Selecting "Save Scene" will save the scene to its corresponding asset. If it is a new scene that is not yet added to your project, you will be prompted to save it to a directory in your projects Assets folder.
You can save a copy of the scene by selecting "Save Scene As".
All of the above actions can also be performed by pressing the corresponding shortcut. Note that all scenes will be saved if done this way.
Other Scene Options
You can change active scenes by right-clicking the scene you wish to set as active and selecting "Set As Active Scene".
A loaded scene can be unloaded and removed from the scene graph by selecting "Remove Scene", this does not delete the scene from your project, but simply unloads it. Make sure to save your changes before doing this.
If you wish to reload the scene, you can select "Reload Scene" to reload to scene from its original asset. This process cannot be undone!
All of the above actions can also be performed by selecting an object/scene and pressing the actions corresponding shortcut.
Re-ordering and Re-parenting
Changing the order of your hierarchy is as simply as draggging an object and dropping it in between 2 other object, you can also parent it to another object by dropping it onto an object instead.
Unparenting can be done by either dropping the object in the empty space of the scene graph, or on the scenes header. It should also be noted that the object can be moved to another scene entirely by dropping it on a different scene.
Scene View
The Scene View renders your scene from the perspective of a separate camera. You can look at any part of your scene by moving around.
To fly around you have to hold down right mouse button and use W, A, S, D (or whichever binds you've chosen) to move around, and move the mouse to look around. Q and E can be used to move up and down, and you can hold shift to fly faster.
It is also possible to move the camera forward and backwards by using the scroll wheel of the mouse.
You can select any object with a mesh in this view by clicking on its rendered mesh.
The Scene View can also preview the different render outputs for debugging purposes. Click on the output selection dropdown on the top left of the window and select an output to display.
You can also toggle on/off the grid, by clicking the Grid button at the top left of the window.
Game View
A preview of how your scene will look from the perspective of an active camera can be found in the Game View. This is also the view where you can test your game when going into play mode.
It should be noted that when play mode is active, as soon as this window gains focus it blocks input to all other windows. Hold alt to temporarily disable input to the game view and regain input to all other windows, then click any window to focus it. You can then let go off alt without losing input.
You can switch display outputs with the dropdown at the top left of the window, keep in mind that if no cameras are present in your scene that render to this display then the render will be empty.
Inspector
The Inspector displays properties for the currently selected object. You can lock the current selection to the inspector by toggling the lock icon.
Entities
If you are using the built-in entity scenes module, you can add, edit and remove components to objects selected from your scene.
Click the Add Component button at the bottom of the components list to add a new component. Right click any components header and select "Remove" to remove the component from the objects entity. The Transfrom component cannot be removed.
Refer to Components for more information about the built-in components.
If an entity object is selected, you can edit its name in the Name field, or inspect its ID underneath the Name field.
Custom editors can be made via editor extensions, these expand the inspector to support any object you may need.
File Browser
Every project in Glory has its own assets, these can be browsed, organized or deleted in the File Browser. It functions the same as a regular file browser, you can create folders, duplicate files, delete files, move files, etc.
Editing a files asset
Select a file in the file browser by clicking it, if it has a supported asset the Inspector will update to display its properties where you can edit them. Note that selecting an asset, currently causes it to be loaded. If the asset is large, this may freeze the editor for a few seconds, this will be addressed in a future patch.
Create a new asset or folder
To create a new asset or folder, you can right click anywhere in the file browser, and under "Create", you can select "Folder" to create a new folder, or any of the other options to create an asset of your choice. Newly created folders and assets will have their rename field active, so type a custom name and press enter to confirm.
For new assets, the file is created automatically, and will contain default values for that asset.
The above action can also be performed by pressing the actions corresponding shortcut.
Rename or delete a folder or file
To rename an item in the file browser, you can right-click it and select "Rename", the name of the selected asset will turn into a text field you can edit immediately by simply typing. Clicking anywhere in the editor, or pressing enter will confirm the rename, hitting escape will cancel the renaming.
Deleting a file or folder can be done by right-clicking it and selecting "Delete", a warning popup will appear warning you that this action cannot be undone. If you are certain click "Yes". If you are deleting a folder, all files in this folder and their underlying assets will be deleted.
All of the above actions can also be performed by selecting a file and pressing the actions corresponding shortcut.
Duplicate or copy a folder or file
You can duplicate a file or folder by right-clicking and selecting "Duplicate", this will copy the folder and all its contents, or the selected file, to a new unique name. The editor will automatically import the new files.
It is also possible to copy and paste a file or folder by right-clicking it and selecting "Copy", then right click anywhere in the file browser in any directory of your choice and select "Paste".
All of the above actions can also be performed by selecting a file and pressing the actions corresponding shortcut.
Module assets
Depending on which modules you chose, some modules come with built-in assets. These are automatically imported when creating a new project and can be browsed in the "Modules" root folder on the left of the file browser, underneath the "Assets" root folder.
Asset Management
Assets are automatically managed for you, please refer to Asset Management for more information!
Console
The Console is where information is logged, it displays notices, warnings, errors, etc. It lists both editor logs and user logs from your own run code.
You can also run commands in the console by using the text input at the bottom of the window.
Commands
To be continued...
Preferences
The editor can be adjusted to your needs, select "File->Preferences" to open the preferences window. This windows offers the following settings:
- Shortcuts where you can edit or set shortcuts to any editor action.
- More comming soon!
Some editor extension also add their own preferences tab:
- Mono where you can edit preferences for the mono editor extension
Shortcuts
Every action in the editor can be bound to a shortcut.
To be continued...
Mono
Glorious requires either Visual Studio 2019 or Visual Studio 2020 for compilation. Make sure either of these are installed.
If Visual Studio is installed but the editor can't find it, go to the Mono tab in the preferences window and click browse to navigate to your visual studio installation folder. Note that you should add the root folder of your IDE, if you can see the folder MSBuild you have the correct root folder.
Modules
Glory is a modular game engine, the user can make their own modules or make use of official modules that came shipped with the engine.
Available official modules include:
There are also a number of built-in modules that are always available:
- File Loader for loading generic text files
- Material Loader for loading .gmat material files
- Material Instance Loader for loading .gminst material instance files
- Shader Source Loader for loading .shader shader source code files (written in GLSL)
SDL Window
Clustered Renderer
OpenGL Graphics
SDL Input
Jolt Physics
SDL Audio
Steam Audio
Steam Audio
Steam Audio
Steam Audio
Scripting Reference
- GloryEngine.Core
- Application
- AssetManager
- Audio
- Font
- Image
- Material
- MaterialInstance
- Mesh
- Model
- Prefab
- Resource
- Script
- Texture
- AudioManager
- Camera
- LogLevel
- Engine
- InputDeviceType
- Input
- InputDevice
- InputMode
- KeyboardKey
- MouseButton
- MouseAxis
- Layer
- LayerManager
- LayerMask
- Math
- Vector2
- Vector3
- Vector4
- Object
- PickResultInternal
- PickResult
- Profiler
- Time
- AudioSimulationSettings
- AudioListener
- SpatializationMode
- AmbisonicsOrder
- OcclusionType
- AirAbsorptionType
- AttenuationSettings
- SpatializationSettings
- AirAbsorptionSettings
- DirectivitySettings
- OcclusionSettings
- TransmissionSettings
- DirectSimulationSettings
- ReflectionSimulationSettings
- PathingSimulationSettings
- AudioSourceSimulationSettings
- AudioSource
- CameraComponent
- EntityComponent
- LayerComponent
- LightComponent
- MeshRenderer
- ModelRenderer
- NativeComponent
- Alignment
- TextComponent
- Transform
- EntityBehaviour
- Scene
- SceneManager
- SceneObject
- GloryEngine.Jolt
- GloryEngine.UI
- GloryEngine.Localize
- GloryEngine.FSM
Scripts
The mono scripting module uses C# scripts and compiles these to assemblies that are loaded and reloaded at runtime.
In order to fully understand how to write scripts you may refer to this document.
Base classes
The base class for writing scripts is EntityBehaviour.
Example:
public class MyScript : EntityBehaviour
{
    ...
}
Namespaces
It is recommended to add your scripts to a namespace, name the namespace the same as your project name.
Exmaple:
namespace MyProject
{
    public class MyScript : EntityBehaviour
    {
        ...
    }
}
Main Events
In order for the engine to communicate with these scripts, a few predefined functions can be used to receive events from the engine.
Start()
This methos is called during the first frame when play mode is activated.
Example:
public void Start()
{
    Debug.LogInfo("Start was called!");
}
Update()
Update is called at the start of every frame, but only during play mode.
Example:
public void Update()
{
    Debug.LogInfo(string.Format("Update() was called with a delta time {0}", Time.DeltaTime));
}
Draw()
Draw is called every frame, regardless of being in play mode or edit mode.
Example:
public void Draw()
{
    Debug.LogInfo(string.Format("Draw() was called with a delta time {0}", Time.DeltaTime));
}
Physics Events
The physics simulation will also trigger events, the engine will forward these the the following functions.
OnBodyActivated()
When a body awakes, the engine will trigger the OnBodyActivated() event on any scripts the object holds.
Example:
public void OnBodyActivated()
{
    Debug.LogInfo("Body activated");
}
OnBodyDeactivated()
When a body enters a sleeping state, the engine will trigger the OnBodyDeactivated() event on any scripts the object holds.
public void OnBodyDeactivated()
{
    Debug.LogInfo("Body deactivated");
}
OnContactAdded()
OnContactAdded is called when another body collides with the current body.
public void OnContactAdded(SceneObject other)
{
    Debug.LogInfo(Object.Name + " collided with " + other.Name);
}
OnContactPersisted()
As long as a collision persists, this event will be triggered every frame.
public void OnContactPersisted(SceneObject other)
{
    Debug.LogInfo("Body collisions persists between " + Object.Name + " and " + other.Name);
}
OnContactRemoved()
As soon as a collision ends, this event will be triggered.
public void OnContactRemoved(SceneObject other)
{
    Debug.LogInfo("Collision ended between " + Object.Name + " and " + other.Name);
}
Properties
Properties are variables that are exposed in the editor. In order to expose a field as a property it must be public.
Example:
public class MyClass
{
    // Will be exposed in the editor
    public float _speed = 5.0f;

    // Will be hidden in the editor
    private float _myVar = 1.0f;
}
Along with any basic type, the following types can also be used as properties:
public SceneObject _sceneObject;
public Mesh _texture;
public Model _texture;
public Material _material;
public Image _texture;
Referencing other objects
You can reference other objects in your scene by exposing a SceneObject variable as a property. Keep in mind that in order to make use of the entities API, you must cast it to an EntitySceneObject first!
GloryEngine.Core
- Application
- AssetManager
- Audio
- Font
- Image
- Material
- MaterialInstance
- Mesh
- Model
- Prefab
- Resource
- Script
- TextFile
- Texture
- AudioManager
- Camera
- LogLevel
- Engine
- InputDeviceType
- Input
- InputDevice
- InputMode
- KeyboardKey
- MouseButton
- MouseAxis
- Layer
- LayerManager
- LayerMask
- Math
- Vector2
- Vector3
- Vector4
- Object
- PickResultInternal
- PickResult
- Profiler
- Time
- Version
- AudioSimulationSettings
- AudioListener
- SpatializationMode
- AmbisonicsOrder
- OcclusionType
- AirAbsorptionType
- AttenuationSettings
- SpatializationSettings
- AirAbsorptionSettings
- DirectivitySettings
- OcclusionSettings
- TransmissionSettings
- DirectSimulationSettings
- ReflectionSimulationSettings
- PathingSimulationSettings
- AudioSourceSimulationSettings
- AudioSource
- CameraComponent
- EntityComponent
- LayerComponent
- LightComponent
- MeshRenderer
- ModelRenderer
- NativeComponent
- Alignment
- TextComponent
- Transform
- EntityBehaviour
- Scene
- SceneManager
- SceneObject
Type Application
Namespace
GloryEngine
Summary
Application API
Properties
Version
Current version of the application, set in the General settings of the project
Type AssetManager
Namespace
GloryEngine
Summary
Asset manager
Properties
Engine
Engine instance
Methods
GetResource(System.UInt64)
Get a loaded resource by ID
Get``1(System.UInt64)
Get a resource by type
Type Audio
Namespace
GloryEngine
Summary
Audio resource
Type Font
Namespace
GloryEngine
Summary
Font resource
Type Image
Namespace
GloryEngine
Summary
Image resource
Type Material
Namespace
GloryEngine
Summary
Material
Methods
SetFloat(System.String,System.Single)
Set the value of a float property
If the property is not found nothing happens
GetFloat(System.String,System.Single@)
Get the current float value of a property
SetDouble(System.String,System.Double)
Set the value of a double property
If the property is not found nothing happens
GetDouble(System.String,System.Double@)
Get the current double value of a property
SetInt(System.String,System.Int32)
Set the value of an int property
If the property is not found nothing happens
GetInt(System.String,System.Int32@)
Get the current int value of a property
SetUInt(System.String,System.UInt32)
Set the value of an unsigned int property
If the property is not found nothing happens
GetUInt(System.String,System.UInt32@)
Get the current unsigned int value of a property
SetBool(System.String,System.Boolean)
Set the value of a bool property
If the property is not found nothing happens
GetBool(System.String,System.Boolean@)
Get the current bool value of a property
SetVec2(System.String,GloryEngine.Vector2)
Set the value of a Vector2 property
If the property is not found nothing happens
GetVec2(System.String,GloryEngine.Vector2@)
Get the current Vector2 value of a property
SetVec3(System.String,GloryEngine.Vector3)
Set the value of a Vector3 property
If the property is not found nothing happens
GetVec3(System.String,GloryEngine.Vector3@)
Get the current Vector3 value of a property
SetVec4(System.String,GloryEngine.Vector4)
Set the value of a Vector4 property
If the property is not found nothing happens
GetVec4(System.String,GloryEngine.Vector4@)
Get the current Vector4 value of a property
SetTexture(System.String,GloryEngine.Texture)
Bind a texture to a material property
If the property is not found nothing happens
GetTexture(System.String,GloryEngine.Texture@)
Get the texture currently bound to a property
Type MaterialInstance
Namespace
GloryEngine
Summary
Material instance handle
Type Mesh
Namespace
GloryEngine
Summary
Mesh handle
Type Model
Namespace
GloryEngine
Summary
Model handle
Type Prefab
Namespace
GloryEngine
Summary
Prefab handle
Type Resource
Namespace
GloryEngine
Summary
Base class for all resources
Properties
Name
Name of the resource
For main assets this is the file name
For sub assets this is the generated name of the subasset
Manager
Resource manager
Type Script
Namespace
GloryEngine
Summary
Script handle
Type TextFile
Namespace
GloryEngine
Summary
Raw text file resource
Properties
FullBody
Full body text of the text file
Type Texture
Namespace
GloryEngine
Summary
Texture handle
Type AudioManager
Namespace
GloryEngine
Summary
Manager for audio
Requires an audio module to be loaded
Properties
MasterVolume
Current master volume
MusicVolume
Current music volume
Methods
PlayMusic(GloryEngine.Audio)
Play an audio asset as music
Type Camera
Namespace
GloryEngine
Summary
A handle for a camera
Properties
CameraID
ID of the camera
Methods
#ctor(System.UInt64)
Construct a camera handle
Type LogLevel
Namespace
GloryEngine
Summary
Log level
Fields
Info
Normal debug info for debugging.
Notice
A notice for things that still attention, bug fixes, changes, additions etc.
Warning
A warning will be displayed in yellow.
Error
An error will be displayed in red.
FatalError
A fatal error will display the error in a seperate window and then close the game.
Type Engine
Namespace
GloryEngine
Summary
Handle to interface with the engine
Properties
AssetManager
Resource manager
SceneManager
Scene manager
WindowSize
Size of the game window
ShowWindowCursor
Whether the cursor of the OS is shown
GrabInput
Whether to claim exclusive input to the application
this locks the cursor to the window.
Type InputDeviceType
Namespace
GloryEngine
Summary
A type of InputDevice
Fields
Keyboard
Kayboard
Mouse
Mouse
Gamepad
Controller/pad
Type Input
Namespace
GloryEngine
Summary
Global class for handling input
Methods
GetInputDevice(GloryEngine.InputDeviceType,System.UInt32,GloryEngine.InputDevice@)
Aqcuire a connected input device
GetInputMode(System.String)
Get an InputMode handle
GetAxis(System.UInt32,System.String,System.String)
Get the float value of an input axis
GetAxisDelta(System.UInt32,System.String,System.String)
Get the amount the axis has changed since the last fame
GetCursorPos(System.UInt32)
Get the current cursor position for a player
IsActionTriggered(System.UInt32,System.String,System.String)
Check wether an action was triggered this frame
SetPlayerInputMode(System.UInt32,System.String)
Change the InputMode of a player
This clears the players input data so if the specified InputMode is not found
the players InputMode will be unknown and will stop receiving any inputs
Type InputDevice
Namespace
GloryEngine
Summary
Handle for an InputDevice
Properties
Name
Name of the InputDevice
DeviceType
Type of the InputDevice
DeviceID
The index of the InputDevice
PlayerIndex
The player that is currently using this device
Type InputMode
Namespace
GloryEngine
Summary
A handle for an InputMode
Properties
DeviceCount
Number of devices that this InputMode requires
Methods
GetInputDeviceType(System.UInt32)
Get the device type that this InputMode needs
Type KeyboardKey
Namespace
GloryEngine
Summary
Key codes for keyboard keys
Type MouseButton
Namespace
GloryEngine
Summary
Key codes for mouse buttons
Up to 19 buttons + scroll wheel up and down are supported
Type MouseAxis
Namespace
GloryEngine
Summary
Key codes for mouse axis
Type Layer
Namespace
GloryEngine
Summary
Layer objects can render to
Fields
Mask
Mask of the layer
Name
Name of the layer
Methods
#ctor(System.String,GloryEngine.LayerMask)
Construct a layer
Type LayerManager
Namespace
GloryEngine
Summary
Layer manager
Methods
AddLayer(System.String)
Add a new layer
GetLayerByName(System.String)
Get a layer by name
LayerMaskToString(GloryEngine.LayerMask@)
Convert a layer mask to ',' separated string
GetLayerIndex(GloryEngine.Layer@)
Get the index of a specific layer
GetLayerAtIndex(System.Int32)
Get a layer at a specific index
Type LayerMask
Namespace
GloryEngine
Summary
A mask representing 1or more layers
Default layer if mask = 0
Fields
Mask
Mask flags
Type Math
Namespace
GloryEngine
Summary
Methods
LookAt(GloryEngine.Vector3,GloryEngine.Vector3,GloryEngine.Vector3)
Generate a matrix that looks at a certain object from a point
Lerp(System.Single,System.Single,System.Single)
Linear interpolate between 2 floats
Type Vector2
Namespace
GloryEngine
Summary
Properties
Normalized
Get normalized vector
Length
Length of the vector
Fields
x
X component
y
Y component
Methods
Dot(GloryEngine.Vector2)
Calculate the Dot product between this vector and another
Lerp(GloryEngine.Vector2,System.Single)
Linear interpolate between this vector and another by factor t
Dot(GloryEngine.Vector2,GloryEngine.Vector2)
Calculate the dot product between 2 vectors
Lerp(GloryEngine.Vector2,GloryEngine.Vector2,System.Single)
Linear interpolate between this vector and another by factor t
Type Vector3
Namespace
GloryEngine
Summary
Properties
Normalized
Get normalized vector
Length
Length of the vector
xy
Get a Vector2 with the x and y component of this Vector3
yz
Get a Vector2 with the y and z component of this Vector3
xz
Get a Vector2 with the x and z component of this Vector3
Fields
x
X component
y
Y component
z
Z component
Methods
Dot(GloryEngine.Vector3)
Calculate the Dot product between this vector and another
Cross(GloryEngine.Vector3)
Calculate the cross product of this vector and another
Lerp(GloryEngine.Vector3,System.Single)
Linear interpolate between this vector and another by factor t
Dot(GloryEngine.Vector3,GloryEngine.Vector3)
Calculate the dot product between 2 vectors
Cross(GloryEngine.Vector3,GloryEngine.Vector3)
Calculate the cross product of 2 vectors
Lerp(GloryEngine.Vector3,GloryEngine.Vector3,System.Single)
Linear interpolate between this vector and another by factor t
Type Vector4
Namespace
GloryEngine
Summary
Properties
Normalized
Get normalized vector
Length
Length of the vector
Fields
x
X component
y
Y component
z
Z component
w
W component
Methods
Dot(GloryEngine.Vector4)
Calculate the Dot product between this vector and another
Lerp(GloryEngine.Vector4,System.Single)
Linear interpolate between this vector and another by factor t
Dot(GloryEngine.Vector4,GloryEngine.Vector4)
Calculate the dot product between 2 vectors
Lerp(GloryEngine.Vector4,GloryEngine.Vector4,System.Single)
Linear interpolate between this vector and another by factor t
Type Object
Namespace
GloryEngine
Summary
Basic object handle
Properties
ID
ID of this object
Name
Name of the object
Fields
_objectID
ID of this object
Type PickResultInternal
Namespace
GloryEngine
Summary
Internal data structure for picking results
Fields
CameraID
Camera that did the picking
ObjectID
Object ID that was picked, or null of no object was picked
Position
World position of the pick
Normal
Normal at the pick position
Type PickResult
Namespace
GloryEngine
Summary
Data structure for picking results
Fields
CameraID
Camera that did the picking
Object
Object that was picked, or null of no object was picked
Position
World position of the pick
Normal
Normal at the pick position
Type Profiler
Namespace
GloryEngine
Summary
Profiler
Methods
BeginSample(System.String)
Begin a profiling sample with a name
This name will show up as the sample record name in the profiler
Internally starts a timer
Type Time
Namespace
GloryEngine
Summary
Time
Properties
DeltaTime
The time it took to process and render the previous frame
Scaled by TimeScale
UnscaledDeltaTime
The unscaled time it took to process and render the previous frame
CurrentTime
Time elapsed since the application started in seconds
Scaled by TimeScale
UnscaledTime
Unsceld time elapsed since the application started in seconds
FrameRate
Current frames per second
TotalFrames
The total number of rendered frames since the start of the application
TimeScale
Current scale of the time, affects all time values except unscaled ones
Type Version
Namespace
GloryEngine
Summary
Version structure
Properties
Major
Major version
Minor
Minor version
SubMinor
Sub minor version or patch
RC
Release candidate
Methods
#ctor(System.Int32,System.Int32,System.Int32,System.Int32)
Constrcutor
Compare(GloryEngine.Version,GloryEngine.Version,System.Boolean)
Compare 2 versions
Type AudioSimulationSettings
Namespace
GloryEngine.Entities.Components
Summary
Audio simulation settings
Type AudioListener
Namespace
GloryEngine.Entities.Components
Summary
Audio listener component
Properties
Enabled
Whether this listener is active
SimulationSettings
Simulation settings for this listener
Type SpatializationMode
Namespace
GloryEngine.Entities
Summary
Spatialization mode
Type AmbisonicsOrder
Namespace
GloryEngine.Entities
Summary
Ambisonics order
Type OcclusionType
Namespace
GloryEngine.Entities
Summary
Occlusion type
Type AirAbsorptionType
Namespace
GloryEngine.Entities
Summary
Air absorption type
Type AttenuationSettings
Namespace
GloryEngine.Entities
Summary
Attenuation settings
Type SpatializationSettings
Namespace
GloryEngine.Entities
Summary
Spatialization settings
Type AirAbsorptionSettings
Namespace
GloryEngine.Entities
Summary
Air absorption settings
Type DirectivitySettings
Namespace
GloryEngine.Entities
Summary
Directivity settings
Type OcclusionSettings
Namespace
GloryEngine.Entities
Summary
Occlusion settings
Type TransmissionSettings
Namespace
GloryEngine.Entities
Summary
Transmission settings
Type DirectSimulationSettings
Namespace
GloryEngine.Entities
Summary
Direct simulation settings
Type ReflectionSimulationSettings
Namespace
GloryEngine.Entities
Summary
Reflection simulation settings
Type PathingSimulationSettings
Namespace
GloryEngine.Entities
Summary
Pathing simulation settings
Type AudioSourceSimulationSettings
Namespace
GloryEngine.Entities
Summary
Simulation settings
Type AudioSource
Namespace
GloryEngine.Entities
Summary
Handle for an AudioSource component
Properties
Audio
Audio asset that this emitter plays
AsMusic
Whether to play this audio on the music channel
Loops
How many times the audio should be looped
AllowEffects
Whether to allow effect processing on this emitter
AutoPlay
Whether to start playing when the scene is activated
Playing
Whether the source is currently playing
Paused
Whether the source is currently paused
Volume
Current volume of the source
SpatializationSettings
Spatialization settings
SimulationSettings
Simulation settings
Type CameraComponent
Namespace
GloryEngine.Entities
Summary
Handle for a CameraComponent component
Properties
HalfFOV
Half angle of the Field of View in degrees
Near
How close objects can get to the camera before they are clipped
Far
How far the camera should render before objects are clipped
DisplayIndex
The index of the display this camera should render to
This is an internal display
Priority
Controls rendering order, ordered by high to low
LayerMask
Mask of layers this camera renders
ClearColor
The color the target is cleared with before rendering the camera to it
Camera
The Camera handle for this component
PickResult
Get the pick result of the last frame
Resolution
Get the rendering resolution for this camera
Methods
PreparePick(GloryEngine.Vector2)
Tell the renderer to pick the backbuffer at the provided screen position during the next render.
Picking happens between regular and late rendering, so late rendered objects are ignored.
NOTE: You can only prepare 1 pick per camera per frame!
Type EntityComponent
Namespace
GloryEngine.Entities
Summary
Base class for components
Properties
Transform
Transform component linked to the entity that owns this component
Active
Active state of the component
Object
Scene object
Type LayerComponent
Namespace
GloryEngine.Entities
Summary
Handle for a LayerComponent component
Properties
Layer
The layer set on this component
Type LightComponent
Namespace
GloryEngine.Entities
Summary
Handle for a LightComponent component
Properties
Color
Color of the light
Intensity
Intensity of the light
Range
Range of the light
Type MeshRenderer
Namespace
GloryEngine.Entities
Summary
Handle for a MeshRenderer component
Properties
Material
Material to redner the Mesh with
Mesh
The mesh to render
Type ModelRenderer
Namespace
GloryEngine.Entities
Summary
Handle for a ModelRenderer component
Properties
Material
The first material in the material list
MaterialCount
Number of materials on this component
Model
The Model to render
Methods
GetMaterial(System.UInt32)
Get a material from the array
AddMaterial(GloryEngine.Material)
Add a material to the array
SetMaterial(System.UInt32,GloryEngine.Material)
Set a material at a specific index in the array
Type NativeComponent
Namespace
GloryEngine.Entities
Summary
Base class for native component handles
Type Alignment
Namespace
GloryEngine.Entities
Summary
Text alignment
Fields
Left
Left alignment
Center
Center alignment
Right
Right alignment
Type TextComponent
Namespace
GloryEngine.Entities
Summary
Handle for a TextComponent component
Properties
Font
Font to use for rendering
Text
Text to render
Scale
Scale to render the text at
Color
Color of the text
Alignment
Text alignment
WrapWidth
Automatic wrapping width thresshold, set to 0 for no wrapping
Type Transform
Namespace
GloryEngine.Entities
Summary
Handle for a Transform component
Properties
LocalPosition
The position of the Entity in parent space
LocalRotation
The Quaternion rotation of the Entity in parent space
LocalRotationEuler
The Euler rotation of the Entity in parent space
LocalScale
The scale of the Entity in parent space
WorldPosition
The world position of the Entity in world space
WorldRotation
The Quaternion rotation of the Entity in world space
WorldRotationEuler
The Euler rotation of the Entity in world space
WorldScale
The scale of the Entity in world space
Forward
The direction the z axis of the Entity is facing
Right
The direction the x axis of the Entity is facing
Up
The direction the y axis of the Entity is facing
World
Transform matrix of the Entity in world space
Type EntityBehaviour
Namespace
GloryEngine.Entities
Summary
Base class for custom Entity behaviours/scripting
Properties
Active
Active state of the component
Type Scene
Namespace
GloryEngine.SceneManagement
Summary
Handle to an entity scene
Properties
ObjectsCount
Number of objects that exists in this Scene
SceneManager
Scene manager
Methods
NewEmptyObject(System.String)
Create a new empty object with name in this scene
GetSceneObjectAt(System.UInt32)
Get an object in the scene
GetSceneObject(System.UInt64)
Get an object in the scene by ID
Destroy(GloryEngine.SceneManagement.SceneObject)
Destroy an object in the scene
InstantiatePrefab(GloryEngine.Prefab,GloryEngine.SceneManagement.SceneObject)
Spawn an instance of a prefab
InstantiatePrefab(GloryEngine.Prefab,GloryEngine.Vector3,GloryEngine.Quaternion,GloryEngine.Vector3,GloryEngine.SceneManagement.SceneObject)
Spawn an instance of a prefab
Type SceneManager
Namespace
GloryEngine.SceneManagement
Summary
Scene manager
Properties
ActiveScene
The currently active scene
OpenSceneCount
Number of scenes currently open
Engine
Engine
Methods
CreateEmptyScene(System.String)
Create a new empty scene and add it to the open scenes
GetOpenScene(System.UInt32)
Get an open scene
GetOpenScene(System.UInt64)
Get an open scene by ID
CloseScene(GloryEngine.SceneManagement.Scene)
Close a scene
LoadScene(System.String,System.Boolean)
Open a scene by name
LoadScene(System.UInt64,System.Boolean)
Open a scene by ID
Type SceneObject
Namespace
GloryEngine.SceneManagement
Summary
Handle for an entity object
Properties
Transform
Transform component linked to this entity
Active
Whether this object is active
Scene
The scene this object exists in
SiblingIndex
The index of the hierarchy order relative to the parent object
Or within the scene if no parent
ChildCount
Number of children parented to this object in the hierarchy
Parent
The object this object is parented to in the hierarchy
Null if no parent
Set to null to unparent
Name
Name of the object
Methods
RemoveComponent(GloryEngine.Entities.EntityComponent)
Remove a component from this entity
GetChild(System.Int32)
Get a child in the hierarchy of this object
GloryEngine.Jolt
- CharacterController
- PhysicsBody
- ActivationType
- BodyType
- Ray
- RayCastHit
- RayCastResult
- Physics
- Shape
- Shapes
Type CharacterController
Namespace
GloryEngine.Entities
Summary
Handle for a CharacterController component
Properties
CharacterID
Internal ID of the character
BodyID
Internal ID of the Physics body of the character managed by the PhysicsModule
BodyActive
Whether the character is active and awake
Position
Position of the character
Use this instead of Transform.Position
Rotation
Rotation of the character
Use this instead of Transform.Rotation
CenterOfMassPosition
Position of the center of mass of the character
LinearVelocity
The current linear velocity of the character
AngularVelocity
The current angular velocity of the character
Shape
Shape of the character
Fields
DefaultActivationType
Default activation type to pass to function calls
Methods
AddImpulse(GloryEngine.Vector3@)
Add an impulse to the character
AddLinearVelocity(GloryEngine.Vector3@)
Add a vector to the linear velocity of the character
SetShape(GloryEngine.Shape,System.Single,System.Boolean)
Set the shape of the character controller
Type PhysicsBody
Namespace
GloryEngine.Entities
Summary
Handle for a PhysicsBody component
Properties
BodyID
Internal ID of the Physics managed by the PhysicsModule
BodyActive
Whether the Physics is active and awake
Valid
Whether this component has a valid Physics
BodyType
Body type
Position
Position of the Physics
Use this instead of Transform.Position
Rotation
Rotation of the Physics
Use this instead of Transform.Rotation
Scale
Scale of the Physics
Use this together with Transform.Scale
CenterOfMassPosition
Position of the center of mass of the Physics
LinearVelocity
The current linear velocity of the Physics
AngularVelocity
The current angular velocity of the Physics
Fields
DefaultActivationType
Default activation type to pass to function calls
Methods
MoveKinematic(GloryEngine.Vector3@,GloryEngine.Quaternion@,System.Single)
Set velocity of such that it will be positioned at inTargetPosition/Rotation in inDeltaTime seconds (will activate if needed)
AddForce(GloryEngine.Vector3@)
Add a force to the Physics
AddForce(GloryEngine.Vector3@,GloryEngine.Vector3@)
Add a force to the Physics from a point
AddTorque(GloryEngine.Vector3@)
Add a torque to the Physics
AddForceAndTorque(GloryEngine.Vector3@,GloryEngine.Vector3@)
Add both force and torque to the Physics
AddImpulse(GloryEngine.Vector3@)
Add an impulse to the Physics
AddImpulse(GloryEngine.Vector3@,GloryEngine.Vector3@)
Add a force to the Physics from a point
AddAngularImpulse(GloryEngine.Vector3@)
Add an angular impulse to the Physics
AddLinearVelocity(GloryEngine.Vector3@)
Add a vector to the linear velocity of the Physics
GetPointVelocity(GloryEngine.Vector3@)
Get the velocity of the Physics from a point
Type ActivationType
Namespace
GloryEngine
Summary
Activation type
Fields
Activate
Activate the body
DontActivate
Leave activation state as is
Type BodyType
Namespace
GloryEngine
Summary
Body type
Fields
Static
Static body
Kinematic
Kinematic body
Dynamic
Dynamic body
Type Ray
Namespace
GloryEngine
Summary
Ray
Fields
Origin
Origin
Direction
Direction
Methods
#ctor(GloryEngine.Vector3,GloryEngine.Vector3)
Construct a ray
Type RayCastHit
Namespace
GloryEngine
Summary
Raycast hit
Fields
Distance
Distance from the origin of the ray
BodyID
ID of the physics body that was hit
SubShapeID
ID of the subshape that was hit
Pos
The position on which the hit occured
Type RayCastResult
Namespace
GloryEngine
Summary
Hit result for a raycast
Fields
Hits
List containing all hits of a raycast
Type Physics
Namespace
GloryEngine
Summary
Physics API
Properties
Gravity
Physics gravity
Methods
CastRay(GloryEngine.Ray,GloryEngine.RayCastResult@,System.Single,GloryEngine.LayerMask,System.UInt32[],System.Boolean,System.Int32)
Do a raycast check.
Whenever there are any hits, result will always have a list with a size of maxHits.
Use the returned integer value to determine the actual hit count.
Type Shape
Namespace
GloryEngine
Summary
Shape
Properties
ShapeID
Internal ID of the shape
Type Shapes
Namespace
GloryEngine
Summary
Shape manager
Methods
Box(GloryEngine.Vector3)
Create a box shape and retreive its handle
Sphere(System.Single)
Create a sphere shape and retreive its handle
Capsule(System.Single,System.Single)
Create a capsule shape and retreive its handle
GloryEngine.UI
- UIBox
- UIComponent
- UIImage
- UIInteraction
- UITarget
- ResolutionMode
- UIRenderer
- UIText
- UITransform
- IUIInteractionHandler
- InteractionHandler
- UIDocument
- UIElement
- UIScene
Type UIBox
Namespace
GloryEngine.UI
Summary
UI Box component
Properties
Color
Color tint of the box
Type UIComponent
Namespace
GloryEngine.UI
Summary
Base class for UI components
Properties
Transform
Transform component linked to the entity that owns this component
Active
Active state of the component
Element
UI Element
Type UIImage
Namespace
GloryEngine.UI
Summary
UI Image component
Properties
Image
The image being rendered
Color
Color tint of the image
Type UIInteraction
Namespace
GloryEngine.UI
Summary
UI Interaction component
Properties
Enabled
Whether interactions are enabled for this component
IsHovered
Whether the element is currently hovered by the cursor
IsDown
Whether the element is currently down by the cursor
InteractionHandler
Current interaction handler
Methods
SetInteractionHandler(GloryEngine.UI.IUIInteractionHandler)
Set the interaction handler for this element
Type UITarget
Namespace
GloryEngine.UI
Summary
UI target
Fields
None
No target, only renders the UI texture
CameraOverlay
Overlay onto camera render
WorldSpaceQuad
3D Quad in world space
Type ResolutionMode
Namespace
GloryEngine.UI
Summary
Resolution mode
Fields
CameraScale
Scale factor of the camera resolution
Fixed
Fixed resolution
Type UIRenderer
Namespace
GloryEngine.UI
Summary
UI Renderer component
Properties
RenderDocument
The current instance of the UI document for rendering
Document
Document to render
Target
Target to render the result to
ResolutionMode
How to handle resolution
Resolution
Resolution of the UI texture
WorldMaterial
Material to use for world space rendering
WorldSize
Size of the quad for world space rendering
InputEnabled
Whether input processing is allowed
Cursor
Current input cursor position
CursorDown
Current input cursor down state
Methods
ConvertWorldToLocalPos(GloryEngine.Vector3)
Convert a world space position to a 2D position on the world
space rendered quad that can be used as the cursor position for input.
Type UIText
Namespace
GloryEngine.UI
Summary
UI Text component
Properties
Font
Font being used to render the text
Text
Text being rendered
Term
Term for translation by external module
Scale
Font scale
Color
Color of the text
Alignment
Text alignment
Type UITransform
Namespace
GloryEngine.UI
Summary
UI Transform component
Properties
Position
Position of the element rect
Size
Size of the element rect
Pivot
Pivot of the element rect from 0-1
Rotation
Additional rotation of the element
Scale
Additional scale of the element
Type IUIInteractionHandler
Namespace
GloryEngine.UI
Summary
Interface for recieving interactions between the cursor and the UI element
Methods
OnHover(GloryEngine.UI.UIInteraction)
The cursor has entered the element bounds
OnUnHover(GloryEngine.UI.UIInteraction)
The cursor has left the element bounds
OnDown(GloryEngine.UI.UIInteraction)
The cursor has selected the element
OnUp(GloryEngine.UI.UIInteraction)
The cursor has released the element
Type InteractionHandler
Namespace
GloryEngine.UI
Summary
Internal handler for UI interactions
Type UIDocument
Namespace
GloryEngine.UI
Summary
UI Document resource
Type UIElement
Namespace
GloryEngine.UI
Summary
UI element
Properties
Active
Whether this object is active
UIScene
The scene this object exists in
SiblingIndex
The index of the hierarchy order relative to the parent object
Or within the scene if no parent
ChildCount
Number of children parented to this object in the hierarchy
Parent
The object this object is parented to in the hierarchy
Null if no parent
Set to null to unparent
Name
Name of the object
Methods
RemoveComponent(GloryEngine.UI.UIComponent)
Remove a component from this entity
GetChild(System.Int32)
Get a child in the hierarchy of this object
FindUIElement(System.String)
Find an element in the children of this object with a name, the search only goes one tree deep
GetComponent``1(System.UInt64)
Gets a component by ID directly, for internal use only.
Must be a UIComponent.
Type UIScene
Namespace
GloryEngine.UI
Summary
UI scene
Properties
Renderer
Renderer component that owns this scene
ID
Unique ID of the UI scene
ObjectsCount
Number of objects that exists in this Scene
Methods
NewEmptyObject(System.String)
Create a new empty object with name in this scene
GetUIElement(System.UInt64)
Get an object in the scene by ID
FindUIElement(System.String)
Find an element in the root of the scene with a name
Instantiate(GloryEngine.UI.UIDocument,GloryEngine.UI.UIElement)
Instantiate a document into this scene
GloryEngine.Localize
Type Locale
Namespace
GloryEngine.Localize
Summary
Locale handling
Properties
Language
Current language
LanguageCount
Number of supported languages in this app
Methods
GetLanguage(System.UInt32)
Get a supported language at a specific index
Translate(System.String)
Translate a term from the loaded string tables
Type Localize
Namespace
GloryEngine.Localize
Summary
Handle for a Localize component
Properties
Term
Term to translate
Type StringTable
Namespace
GloryEngine.Localize
Summary
String table resource
Methods
FindKeys(System.String)
Find keys belonging to a group at a specific path
FindKeys(System.String,System.String[],System.UInt32)
Find keys belonging to a group at a specific path, without allocating an array
FindKeysRecursive(System.String)
Find keys belonging to a group and all subgroups of that group recursively
FindKeysRecursive(System.String,System.String[],System.UInt32)
Find keys belonging to a group and all subgroups of that group recursively, without allocating an array
FindSubgroups(System.String)
Find subgroup names belonging to a group at a specific path
FindSubgroups(System.String,System.String[],System.UInt32)
Find subgroup names belonging to a group at a specific path, without allocating an array
Type StringTableLoader
Namespace
GloryEngine.Localize
Summary
Handle for a StringTableLoader component
Properties
TableToLoad
Table to load on Start
KeepLoaded
Whether to skip unloading the table when this component is destroyed
Type StringsOverrideTable
Namespace
GloryEngine.Localize
Summary
Strings override table resource
GloryEngine.FSM
Type FSMInstance
Namespace
GloryEngine.FSM
Summary
Runtime state of a finite state machine
Properties
ID
ID of this instance
CurrentState
Current state of this state machine
Methods
SetNodeHandler(GloryEngine.FSM.FSMNode,GloryEngine.FSM.IFSMNodeHandler)
Set a node handler for state changes on a specific node
SetTrigger(System.String)
Set a trigger property
SetBool(System.String,System.Boolean)
Set a bool property value
SetNumber(System.String,System.Single)
Set a number property value
Type FSMManager
Namespace
GloryEngine.FSM
Summary
Manager for finite state machines
Methods
DestroyInstance(GloryEngine.FSM.FSMInstance)
Destroy an instance of a state machine
Type FSMNode
Namespace
GloryEngine.FSM
Summary
State node in a state machine
Properties
Name
Name of this node
ID
ID of this node
TransitionCount
Number of transitions going from this node
Methods
FindTransition(System.String)
Find a transition going from this node
GetTransition(System.UInt32)
Get a transition going from this node
Type FSMTemplate
Namespace
GloryEngine.FSM
Summary
Finite State Machine resource
Methods
FindNode(System.String)
Find a node in this state machine
FindNode(System.UInt64)
Find a node in this state machine by ID
Type FSMTransition
Namespace
GloryEngine.FSM
Summary
Transition data between 2 states in a state machine
Type IFSMNodeHandler
Namespace
GloryEngine.FSM
Summary
Handler interface for state changes
Methods
OnStateEntry(GloryEngine.FSM.FSMInstance)
Called when the state machine transitions to this state
OnStateExit(GloryEngine.FSM.FSMInstance)
Called when the state machine transitions from this state